| 44.4. Handling contacts | ||
|---|---|---|
 | Chapter 44. LDAP - Lightweight Directory Access Protocol |  |
| 44.4. Handling contacts | ||
|---|---|---|
| | Chapter 44. LDAP - Lightweight Directory Access Protocol | |
There are two ways to access the Abilis LDAP server, the Abilis web interface or a LDAP client.
To access the LDAP web interface via a browser an Abilis User must be active, must have HTTP and LDAP parameters set to yes and must have HTTP and LDAP rights.
Using the admin account you need just to use the following command:
[21:29:04] ABILIS_CPX:s user:admin act:yes ldap:yes http:yes

COMMAND EXECUTED
If you use another account, remember to allow the HTTP rights too.
[21:49:08] ABILIS_CPX:s user:test act:yes ldap:yes http:yesCOMMAND EXECUTED [21:49:35] ABILIS_CPX:a http rights id:2 user:test file:r dir:lCOMMAND EXECUTED
Non-administrator users by default have only the "read" right. The administrator has the full control.
If you want a LDAP account be also able to modify/create/remove contacts allowing it to have full rights then issue following commands:
[21:49:08] ABILIS_CPX:a ldap rights id:1 user:test grants:rwcdCOMMAND EXECUTED [21:49:28] ABILIS_CPX:a ldap rights id:2 user:test grants:rwcdCOMMAND EXECUTED [21:49:38] ABILIS_CPX:a ldap rights id:3 user:test grants:rwCOMMAND EXECUTED
Let's use admin account in this example, anyway you know how to use another account.
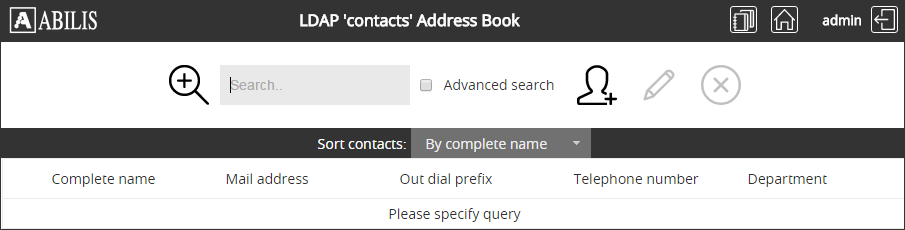
Log into the web interface as admin and click the "LDAP Address books" link.
Look at the LDAP administration page.
The administrator has full access to all the address books. The interface includes also the name of the Base DN for each address book. The interface also allows to import/export a single address book.
![[Note]](../images/note.png) | Note |
|---|---|
To import/export the whole LDAP DB or to handle personal address books, visit the "Advanced LDAP administration" page. Although LDAP server includes disaster recovery features, a periodical backup (via exporting) of address books or the whole DB is suggested. |
Click on contacts address book.
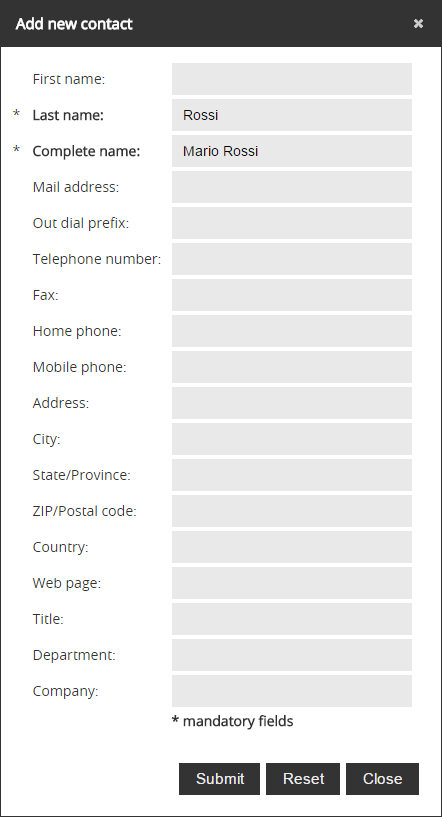
Then you may add a new contact via the  button.
| Note |
|---|---|
In the system address book, synchronised attributes "commonName" and "telephoneNumber" cannot be edited, although having the "w" right. |
To access LDAP server via a LDAP client install LDAPAdmin or JXplorer on a PC.
You also need an Abilis user that must have the LDAP parameter set to yes.
Using the admin account you need just to use the following command:
[21:29:04] ABILIS_CPX:s user:admin act:yes ldap:yes

COMMAND EXECUTED
If you use another account, remember to allow LDAP rights too.
[21:49:08] ABILIS_CPX:s user:test act:yes ldap:yes

COMMAND EXECUTED
Non-administrator users by default have only the "read" right. The administrator has full control.
If you want a LDAP account be able also to modify/create/remove contacts allowing it to have full rights issue following commands.
[21:49:08] ABILIS_CPX:a ldap rights id:1 user:test grants:rwcdCOMMAND EXECUTED [21:49:28] ABILIS_CPX:a ldap rights id:2 user:test grants:rwcdCOMMAND EXECUTED [21:49:38] ABILIS_CPX:a ldap rights id:3 user:test grants:rwCOMMAND EXECUTED
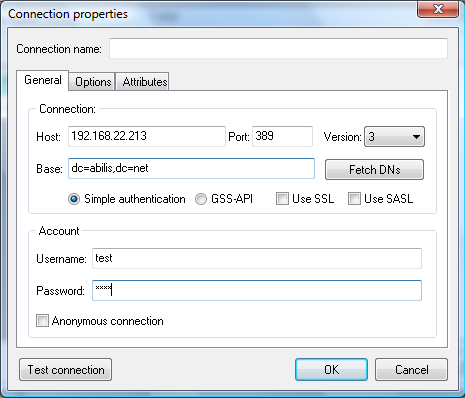
Open LDAPAdmin and create a new connection.
Let's access as user "test".
Edit following parameters.
| Parameter | Value |
| Host | <IP address of Abilis> |
| TCP port | 389 |
| Base DN | dc=abilis,dc=net |
| Username | <The name of an Abilis user allowed to LDAP (LDAP:YES)> |
| Password | <The password of an Abilis user allowed to LDAP (LDAP:YES)> |
![[Caution]](../images/caution.png) | Caution |
|---|---|
LDAP uses plain authentication on a non encrypted connection so use the account only in controlled networks or at least use an ad hoc LDAP account (a user that can just access LDAP) to avoid to share a password with other Abilis services for that user. |
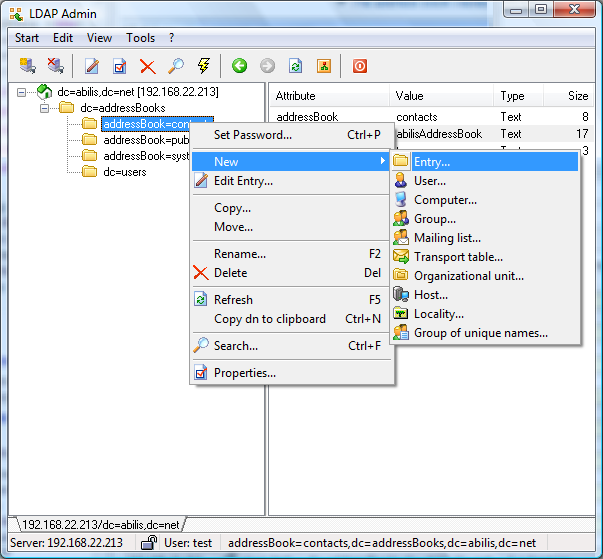
Add a new entry.
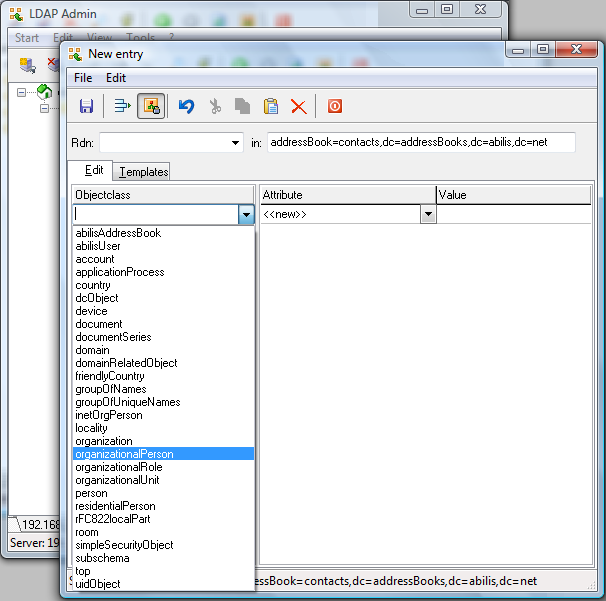
Add the obectClass organizationalPerson via the Objectclass combobox.
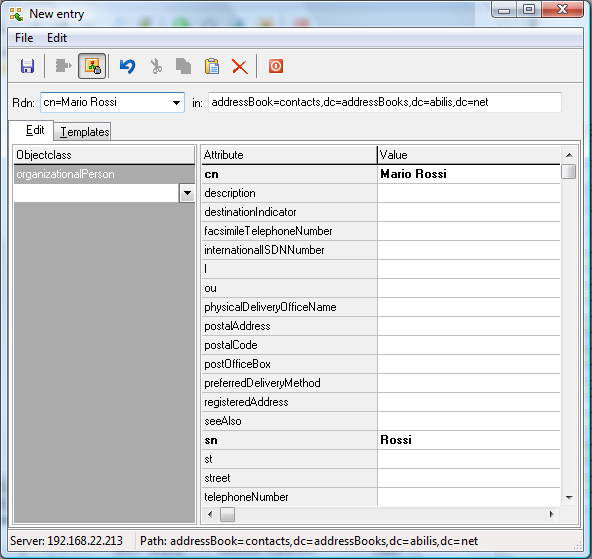
Edit attributes and set the Rdn as "cn=<common name>".
| Note |
|---|---|
Use the Save button to save the entry, if you receive a message explaining that the operation cannot be completed, you may not have the permission to do such operation. |
| |  | |
| 44.3. LDAP use cases |  | 44.5. LDAP diagnostics and statistics |