| 56.6. Preferences | ||
|---|---|---|
 | Chapter 56. OPC panel - End user manual |  |
| 56.6. Preferences | ||
|---|---|---|
| | Chapter 56. OPC panel - End user manual | |
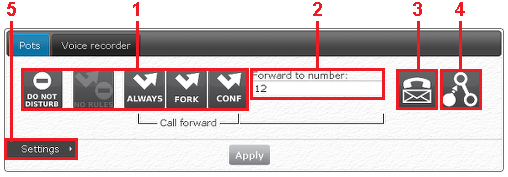
![]() Preferences
button: Open the preferences window.
Preferences
button: Open the preferences window.
Choose the active rule for call forwarding / forking
The number where calls are forwarded.
Enable/Disable voicemail
Enable/Disable call waiting
Open the settings
You can choose what rule enable:
![]() DND (Do Not
Disturb): You don't receive calls. If someone tries to call you,
he receives the busy signal.
DND (Do Not
Disturb): You don't receive calls. If someone tries to call you,
he receives the busy signal.
![]() Disable
all the rules enabled.
Disable
all the rules enabled.
![]() The call
is always forwarded.
The call
is always forwarded.
![]() Enable only
options about calls forking.
Enable only
options about calls forking.
![]() Enable the
rules configured in Settings.
Enable the
rules configured in Settings.
![]() Use the
Advanced rules (if some advanced rules are defined, this icon
takes the place of No Rules).
Use the
Advanced rules (if some advanced rules are defined, this icon
takes the place of No Rules).
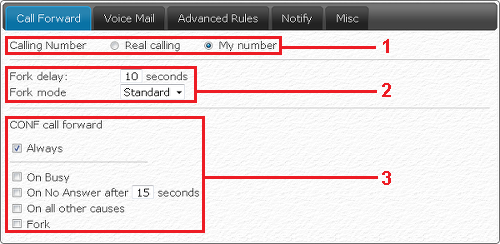
To configure the call forward, click on Settings and on the Call Forward tab. You'll see something like the following figure:
Calling number: select if you want that the receiver of the forwarded/forked call sees your number or the real calling number.
Fork options:
Forward options: this options are enabled when you select
the Conf rule ![]() .
.
Always: your phone doesn't ring and the calls are immediatly forwarded. If you enable this option the others are not selectable.
On busy: the call is forwarded only when your telephone is busy.
On No Answer after # seconds: if you don't answer after a defined number of seconds, the call is forwarded.
On all other causes: the call is forwarded in other causes different from the previous ones.
Fork: enable the call forking for the configured settings.
You can set some personalized rules, that apply only under certain conditions which parameters are:
interface
calling/called number
time
To access to the advanced rule open the Preferences
![]() , click on
settings, advanced rules and click on the icon
, click on
settings, advanced rules and click on the icon ![]() .
.
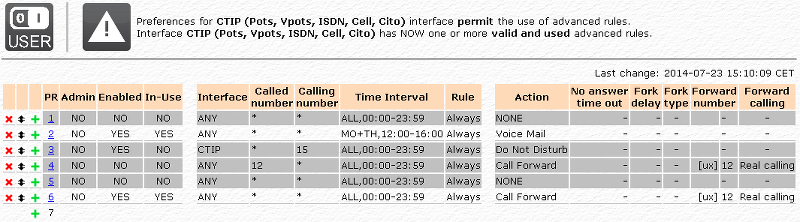
The Advanced rules page shows a table of the configured rules.
 Remove a rule
 Exchange the priority of a rule
 Add a new rule
When adding new rule, you may want to know what is the meaning of the following fields:
CONTROL
PR: Set the priority of the rule. If another rule has the same priority, it increase by 1.
Admin: If this box is checked, only the admin can modify this rule. You can't check this box if you don't have the admin privileges.
Enabled: Enable the current rule.
In-Use: Choose if use or not the current rule. If a rule is not Enabled, you can't use it even if you have checked this checkbox.
FILTERS: The rule is active only if the call has the same parameters as the filters
Interface: Choose the telephone interface (CTIP, CLUS, IAX, SIP)
Called number: The called number of the incoming call. (Example: If someone calls the number 12 and the call is forwarded to 14, the called number is 12)
Calling number: The number of the caller
Time interval: Choose at what days and hours the rule has to be active.
Rule: Choose what causes the action to be executed.
ACTIONS
Action: Action executed when the filter conditions are met.
No Answer time out: Amount of ringing time for considering the call not answered.
Fork delay: Delay between the start of ringing and start of the forked call.
Forward number: The number to call when a call is forwarded or forked.
Forward calling number: select if you want that the receiver of the forwarded/forked call see your number or the real calling number.
If you want to modify a rule, click on the priority number.
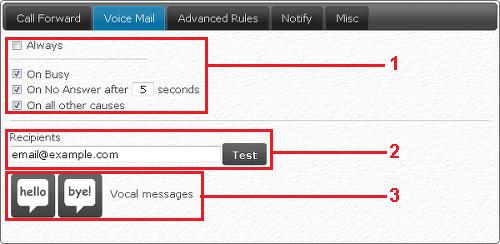
![]() Enable/Disable voicemail button: To enable or disable the voicemail
click on this button. When the voicemail is enabled the button blinks
Enable/Disable voicemail button: To enable or disable the voicemail
click on this button. When the voicemail is enabled the button blinks
 .
.
Select conditions to enable the voice mail.
Insert the mail address where send the caller's message in WAV format (CCITT A-law - 8 KHz - 8 bit - Mono). Multiple mail addresses must be divided by "," or ";". The test button sends a e-mail to the chosen addresses to check if they are available.
Change the audio messages to be played by the voice mail.
You can set 2 audio messages:
 Button
to change outgoing message: This audio message is played at the
begin of the voice mail, before the recording start.
Button
to change outgoing message: This audio message is played at the
begin of the voice mail, before the recording start.
 Button to
change end message: This audio message is played at the end of the
voice mail when the max time for the caller's message is
reached.
Button to
change end message: This audio message is played at the end of the
voice mail when the max time for the caller's message is
reached.
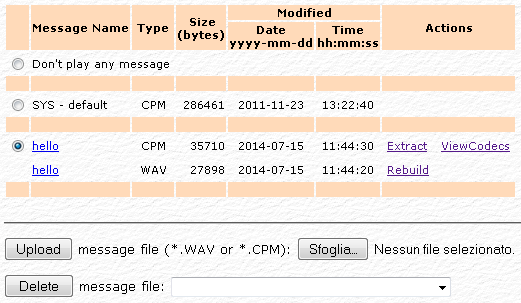
Clicking on one of the previous buttons you get a page like the following one:
You can select a CPM (is our proprietary format, probably
you don't have this) or WAV file. The WAV file must be coded in CCITT
A-law (or u-law) - 8 KHz - 8 bit - Mono, so if your file has not the
right format you must convert it.
The voice mail can play CPM files only, so if you have uploaded a WAV file you need to convert it to a CPM. You can do this clicking on Rebuild.
When you have your personalized CPM audio message on the Abilis, you can select it.
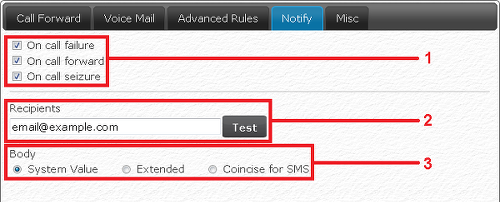
You can receive a notification e-mail when a call is lost, forwarded or picked up by other users.
This function can be enabled in the settings, under the Notify tab.
Select the conditions to send the e-mail.
Insert the mail address. Multiple mail addresses must be divided by "," or ";". The test button sends a e-mail to the chosen addresses to check if they are available.
Select if send extended data or a short summary.
You can hide your number on outgoing calls going on
Settings, under Misc tab and
selecting No
in the Calling number presentation in outgoing calls
(1)
The time interval between calls and the amount of retries can be modified clicking on Settings, under Misc tab, and inserting your personalized values (2)
| |  | |
| 56.5. Address book |  | 56.7. Recording |